【Kotlin Compiler】IR Transform Plugin 教程

【Kotlin Compiler】IR Transform Plugin 教程

  • 本文会通过一个小 demo 手把手教你学会如何利用 Kotlin Compiler Plugin 进行 IR 插桩。如果你对 IR(intermediate representation) 是什么还一知半解,不妨先参考 【Kotlin Compiler】IR 介绍
  • 如果你想直接参考源码,可以直接看这里,如果能点个 star 就更好了

下面开始正题

我们的目标是什么?

先来看两段代码

1
2
3
4
5
6
7
8
fun foo(param1: String? = "Hello", param2: String? = "World"): String {
println("foo costs[${startTime.elapsedNow()}]")
val startTime = TimeSource.Monotonic.markNow() //类似 Java 中的 System.currentMills()
// do something cost time
val result = param1 + param2
println("foo costs[${startTime.elapsedNow()}]")
return result
}

这是我们日常通过 log 统计方法耗时的一个小例子,如果需要统计的方法数量较多,我们要手写非常多的重复代码。

在 Java 中,我们可以找到被注解标注的方法,然后通过 Transform 字节码的方式将模板代码插到指定位置。在 Kotlin 中,方案是一样的,只不过我们需要 Transform 的不是字节码了,而是 IR。做完 Transform 的工作后,只需写下面这段代码就可满足需求。

1
2
3
4
@Cost
fun foo(param1: String? = "Hello", param2: String? = "World"): String {
return param1 + param2
}

怎样开发一个 Kotlin Compiler Plugin?

了解完我们的目标后,就需要了解开发一个 Kotlin Compiler Plugin 的标准过程是什么?我们需要了解那些概念,要用哪些 API?

下面我们先来看看如何开发 Kotlin Compiler Plugin

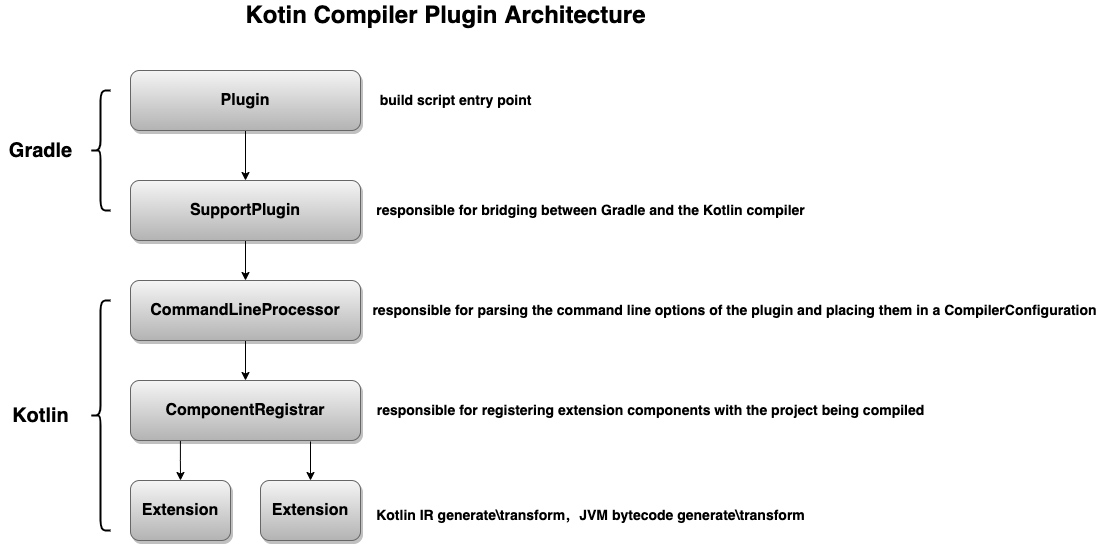
此图是 Kotlin Compiler Plugin 的架构图,我已经在图中标注了每个模块的职责是什么,不再赘述。

0.工程搭建

环境说明:

  • IDE-IntelliJ IDEA 2021.3.3 (Community Edition)
  • KotlinPlugin-1.6.21
  • JDK-1.8

下面是工程中需要依赖的库和插件,详细可参考Sample代码依赖

1
2
3
4
5
6
7
8
9
10
11
12
13
14
15
16
apply plugin: "java-gradle-plugin"
apply plugin: "org.jetbrains.kotlin.jvm"
apply plugin: "kotlin-kapt"

dependencies {
implementation gradleApi()
implementation("org.jetbrains.kotlin:kotlin-stdlib:1.6.21") // kotlin 标准库
implementation("org.jetbrains.kotlin:kotlin-gradle-plugin-api:1.6.21") // kotlin-插件 api
implementation("org.jetbrains.kotlin:kotlin-compiler-embeddable:1.6.21") // kotlin-插件 api 注意:如果需要用 com.github.tschuchortdev:kotlin-compile-testing,这里必须使用 embeddable 版本
implementation "com.google.auto.service:auto-service:1.0.1" //auto-service,找到插件中的具体实现类
kapt "com.google.auto.service:auto-service:1.0.1" //kapt 生成映射代码

testImplementation 'org.junit.jupiter:junit-jupiter:5.8.1' // junit engine
testImplementation 'org.jetbrains.kotlin:kotlin-test-junit:1.6.21'
testImplementation("com.github.tschuchortdev:kotlin-compile-testing:1.4.8") //compiler plugin / ksp plugin 单测扩展库
}

1.KotlinCompilerPluginSupportPlugin

此类是 Gradle 和 Kotlin 的桥梁,主要职责是提供插件入口,获取插件 AGV(artifact group version)

1
2
3
4
5
6
7
8
9
10
11
12
13
14
15
16
17
18
19
class MethodPerfIRPlugin: KotlinCompilerPluginSupportPlugin {
override fun applyToCompilation(kotlinCompilation: KotlinCompilation<*>): Provider<List<SubpluginOption>> {
val project = kotlinCompilation.target.project
val extension = project.extensions.getByType(MethodPerfExtension::class.java) as MethodPerfExtension
//可以获取到 build.gradle 中定义的一些配置,透传到 kotlin plugin 中
return project.provider {
listOf(
SubpluginOption(key = "string", value = extension.string),
SubpluginOption(key = "file", value = extension.file),
)
}
}

/**
* [isApplicable] is checked against compilations of the project, and if it returns true,
* then [applyToCompilation] may be called later.
*/
override fun isApplicable(kotlinCompilation: KotlinCompilation<*>): Boolean = project.plugins.hasPlugin(MethodPerfIRPlugin::class.java)
}

重点要说的是 applyToCompilationisApplicable 两个方法:

  • isApplicable比较简单,只有当其返回 true 的时候,applyToCompilation才会执行
  • applyToCompilation 重点是返回值,在 build.gradle 的一些自定义配置可以通过这里透传到 Kotlin Compiler Plugin 中来,方便后续使用

2.CommandLineProcessor

1
2
3
4
5
6
7
8
9
10
11
12
13
14
15
16
17
18
19
20
21
22
23
24
25
26
27
28
29
30
31
32
33
34
35
36

@AutoService(CommandLineProcessor::class) // don't forget it
class MethodPerfCommandLineProcessor : CommandLineProcessor {
// 指明插件 id
override val pluginId: String = "com.zzt.demo.kt-method-perf-plugin"

// 自定义 cli option
override val pluginOptions: Collection<AbstractCliOption> = listOf(
CliOption(
optionName = OPTION_STRING,
valueDescription = "string",
description = "sample string argument",
required = false,
),
CliOption(
optionName = OPTION_FILE,
valueDescription = "file",
description = "sample file argument",
required = false,
),
)

// 解析 cli 参数
override fun processOption(
option: AbstractCliOption,
value: String,
configuration: CompilerConfiguration
) {
println("processOption:: option=$option value=$value")
return when (option.optionName) {
OPTION_STRING -> configuration.put(ARG_STRING, value)
OPTION_FILE -> configuration.put(ARG_FILE, value)
else -> throw IllegalArgumentException("Unexpected config option ${option.optionName}")
}
}
}

此类和 ComponentRegistrar 是我们写插件真正的入口,CommandLineProcessor 的作用是解析 cli 中的参数并保存下来,本次目标不涉及,大家有兴趣或有需求可以自己研究。

需要注意的是,此类一定要用 @AutoService 标记,否则无法调用到我们的实现

3.ComponentRegistrar

1
2
3
4
5
6
7
8
9
10
11
@AutoService(ComponentRegistrar::class) // don't forget it
class MethodPerfComponentRegistrar: ComponentRegistrar {

override fun registerProjectComponents(project: MockProject, configuration: CompilerConfiguration) {
println("registerProjectComponents:: ${project.name}")
val string = configuration.get(MethodPerfCommandLineProcessor.ARG_STRING, "String")
val file = configuration.get(MethodPerfCommandLineProcessor.ARG_FILE, "File")
IrGenerationExtension.registerExtension(project, MethodPerfExtension(string, file))
}

}

此类的作用有两个:

  1. 使用 CommanLineProcessor 中保存好的 option,本次逻辑不涉及,参考代码写法即可
  2. 注册 Extension,下面具体看 Extension 是什么

同样注意,不要忘记加 @AutoService

4.Extension

重点来了,我们 80% 的逻辑可能都写在 Extension 中,通过此类我们可以对 IR 进行增删改,具体如下

1
2
3
4
5
class MethodPerfExtension(): IrGenerationExtension {
override fun generate(moduleFragment: IrModuleFragment, pluginContext: IrPluginContext) {
// transform IR
}
}

此类中只有 generate 方法,其中包含两个参数:

  1. IrModuleFragment 代表 IR 树的根节点,描述的是 module 相关的信息,比如里面是一组 irFile,自顶向下遍历可以得到整个 module 的 ir 信息
  2. IrPluginContext 包含了大多数我们在 transform IR 时用到的 api 和信息

Dump IR 树

在 Kotlin IR 中,IrElement 是一切 IR 结构的父类,我们可以通过其扩展方法 IrElement.dump 查看 IR 树是怎样的结构。

比如,我们在 generate 中调用 moduleFragment.dump(),来查看下面代码的 IR

1
2
3
fun main() {
println("Hello, World!")
}

会得到

1
2
3
4
5
6
7
8

MODULE_FRAGMENT name:<main>
FILE fqName:<root> fileName:/var/folders/lt/k622ndqs14l7_tcxst93z3cm0000gp/T/Kotlin-Compilation7335327567848552666/sources/main.kt
FUN name:main visibility:public modality:FINAL <> () returnType:kotlin.Unit
BLOCK_BODY
CALL 'public final fun println (message: kotlin.Any?): kotlin.Unit [inline] declared in kotlin.io.ConsoleKt' type=kotlin.Unit origin=null
message: CONST String type=kotlin.String value="Hello, World!"

实现目标

了解 Kotlin Complier Plugin 的基本情况后,你应该大致清楚了开发插件的过程。下面我们通过完成目标,加深对这个过程的理解。

0.技术方案

Transform 流程并不复杂,主要包含了:

  1. 找到加注解的方法
  2. 重写方法体 IR
    a. 增加时间戳
    b. 原始方法体
    c. 统计耗时
  3. 如果方法包含返回值,需要先保存返回值,再进行统计耗时

1.开发 IrElementTransformer

IrElementTransformer 继承自 IrElementVisitor,功能类似,不再赘述。

直接看一下代码,我们在 IrElementTransformer 中做了什么

1
2
3
4
5
6
7
8
9
10
11
12
13
14
class MethodCostTimeTransformer(
private val pluginContext: IrPluginContext
): IrElementTransformerVoidWithContext() {

override fun visitFunctionNew(declaration: IrFunction): IrStatement {
println("visitFunctionNew:: ${declaration.render()}")
val body = declaration.body
val annotationClass = pluginContext.referenceClass(FqName("com.zzt.demo.annotation.Cost"))!!
if (body != null && declaration.hasAnnotation(annotationClass)) { //有方法体&被注解标注的方法
declaration.body = irCost(declaration, body) //transform 方法体
}
return super.visitFunctionNew(declaration)
}
}

逻辑比较清晰,找到我们定义的注解,看被 visit 的方法是否加了注解,如果加了,就调用 irCost() Transform 方法体 IR

下面看看 irCost() 做了什么

1
2
3
4
5
6
7
8
9
10
11
12
13
14
15
16
17
18
private fun irCost(
irFunction: IrFunction,
irBody: IrBody): IrBlockBody {
println("irCost:: ")
return DeclarationIrBuilder(pluginContext, irFunction.symbol).irBlockBody {
+costEnter(pluginContext, irFunction) //打印目标函数信息

val startTime = irTemporary(irCall(pluginContext.markNowFunc()).also {
it.dispatchReceiver = irGetObject(pluginContext.monotonicClass())
}) // 相当于调用 TimeSource.Monotonic.markNow()

+irBlock(resultType = irFunction.returnType) {
for(statement in irBody.statements) { //原有方法体中的表达式
+statement
}
}.transform(CostTimeReturnTransformer(pluginContext, irFunction, startTime), null)
}
}

  1. 在方法耗时统计之前,通过 costEnter() 插桩打印目标函数的信息,比如方法名,参数是什么
  2. 调用 TimeSource.Monotonic.markNow() 记录开始时间 startTime
  3. 追加原有方法体内容,并开始进行返回体的 Transform

2. CostTimeReturnTransformer

1
2
3
4
5
6
7
8
9
10
11
12
13
14
15
16
17
18
19
20
21
22
23
24
25
26
class CostTimeReturnTransformer(
private val pluginContext: IrPluginContext,
private val irFunction: IrFunction,
private val startTime: IrValueDeclaration
): IrElementTransformerVoidWithContext() {

override fun visitReturn(expression: IrReturn): IrExpression {
println("visitReturn:: ${expression.render()}")
if (expression.returnTargetSymbol != irFunction.symbol) //只 transform 目标函数
return super.visitReturn(expression)

println("transform return:: ")
return DeclarationIrBuilder(pluginContext, irFunction.symbol).irBlock {
if (irFunction.returnType == pluginContext.irBuiltIns.unitType) {
+costExit(pluginContext, irFunction, startTime)
return@irBlock
}
val result = irTemporary(expression.value) //保存返回表达式
+costExit(pluginContext, irFunction, startTime, irGet(result)) // 将统计时间逻辑插到 return 之前
+expression.apply {
value = irGet(result) // 将原有的返回表达式补回
}
}
}

}

上述代码逻辑也比较清晰

  1. 如果不是目标函数,直接 return
  2. 如果目标函数无返回值,直接插桩 costExit()
  3. 如果有返回值,则需要先保存返回值到临时变量,然后再插桩 costExit()并且要补上原有的返回值,否则会造成方法一直返回 null 的情况

3. 测试

https://github.com/tschuchortdev/kotlin-compile-testing 此库专用于 Kotlin Compiler Plugin 或者 KSP Plugin 的单测,让我们不需要将插件集成到目标工程就能进行测试,且容易上手,推荐大家使用。

但目前有个库兼容问题需要注意,我们在开发插件时必须依赖 implementation("org.jetbrains.kotlin:kotlin-compiler-embeddable:1.6.21"),不能使用 implementation("org.jetbrains.kotlin:kotlin-compiler:1.6.21")

下面就看看如何进行测试

1
2
3
4
5
6
7
8
9
10
11
12
13
14
15
16
17
18
19
20
21
22
23
24
25
26
27
28
29
30
31
32
33
34
35
36
37
38
39
40
41
42
43
44
45
46
47
48
49
50
class MethodPerfTest {
@Test
fun `IR plugin`() {
// val result = compile(
// sourceFile = SourceFile.fromPath(File("{path}/main.kt"))
// )
val result = compile(
sourceFile = SourceFile.kotlin("main.kt", """
import com.zzt.demo.annotation.Cost

fun main() {
println(foo())
println(foo("Transform", "Kotlin IR"))
}

@Cost
fun foo(param1: String? = "Hello", param2: String? = "World"): String {
println("foo called param1=[${'$'}param1], param2=[${'$'}param2]") //注意 $ 需要转义
return param1 + param2
}
""".trimIndent())
)

assertEquals(KotlinCompilation.ExitCode.OK, result.exitCode)

//类加载目标产物,看最终运行结果是否符合预期
val ktClazz = result.classLoader.loadClass("MainKt")
val main = ktClazz.declaredMethods.single { it.name == "main" && it.parameterCount == 0 }
main.invoke(null)
}

fun compile(
sourceFiles: List<SourceFile>,
plugin: ComponentRegistrar = MethodPerfComponentRegistrar(),
): KotlinCompilation.Result {
return KotlinCompilation().apply {
sources = sourceFiles
useIR = true
compilerPlugins = listOf(plugin)
inheritClassPath = true
}.compile()
}

fun compile(
sourceFile: SourceFile,
plugin: ComponentRegistrar = MethodPerfComponentRegistrar(),
): KotlinCompilation.Result {
return compile(listOf(sourceFile), plugin)
}
}
  1. 通过 SourceFile.kotlinSourceFile.fromPath() 可以传入需要测试的代码
  2. 测试代码会通过集成了 MethodPerfComponentRegistrar 的 kt 编译器进行编译
  3. 通过类加载目标代码,反射调用 main 函数,看执行结果是否正确

下面看看 Transform IR 的结果

1
2
3
4
5
6
7
8
9
10
11
12
13
14
⇢ foo(param1=Hello, param2=World) 
start function body ...
foo called param1=[Hello], param2=[World]
Hello, World
end function body
⇠ foo costs [1.02ms] returnValue=HelloWorld

⇢ foo(param1=Transform, param2=Kotlin IR)
start function body ...
foo called param1=[Transform], param2=[Kotlin IR]
Hello, World
end function body
⇠ foo costs [41.0us] returnValue=TransformKotlin IR

参考

  1. Writing Your First Kotlin Complier Plugin
  2. Writing Your Second Kotlin Compiler Plugin, Part 5 — Transforming Kotlin IR